 Filipe Teixeira
This article covers the creation of a minimalist dotnet 8 API with continuous delivered automated import of the OpenAPI description to API Management in Azure. We review the entire creation of the API, the import of the necessary packages for the project, the Swagger OpenAPI spec export and the Azure DevOps pipeline tasks to build, deploy and import the specs into API Management. As a bonus the full solution also includes the bicep template to deploy both the API and the API Management from scratch.
With the increase of internal and external integrations, the usage of API Management has increased greatly, the advantages it provides to developers are amazing. By concentrating all the API documentation into a single entry point and ensuring security and reliability policies, API Management is now a key piece in every Azure Architecture design, even featuring in the Azure Well-Architectured Framework.
In this approach we will deploy a dotnet 8 API using Azure DevOps yaml pipelines, we will augment the pipeline create to both produce the API OpenAPI spec with Swashbuckle CLI and import it directly to API Management using the Azure CLI. The goal is for all this process to be automated and, we a simple click of a push to the GitHub repo, automatically generate all the necessary steps to reflect the change in the respective Azure environment.
Sound interesting? Let's get into it then.
TLDR: Full development available in the solution git repo.
Architecture
Before going into the schematics it's necessary to explain how we will accomplish the solution. Our main goal here is to automatically expose our API changes to the user through API Management without the extra step to publish the APIs changes manually in the portal.
For that let's look at our proposed solution architecture and how the end solution achieved exactly that:
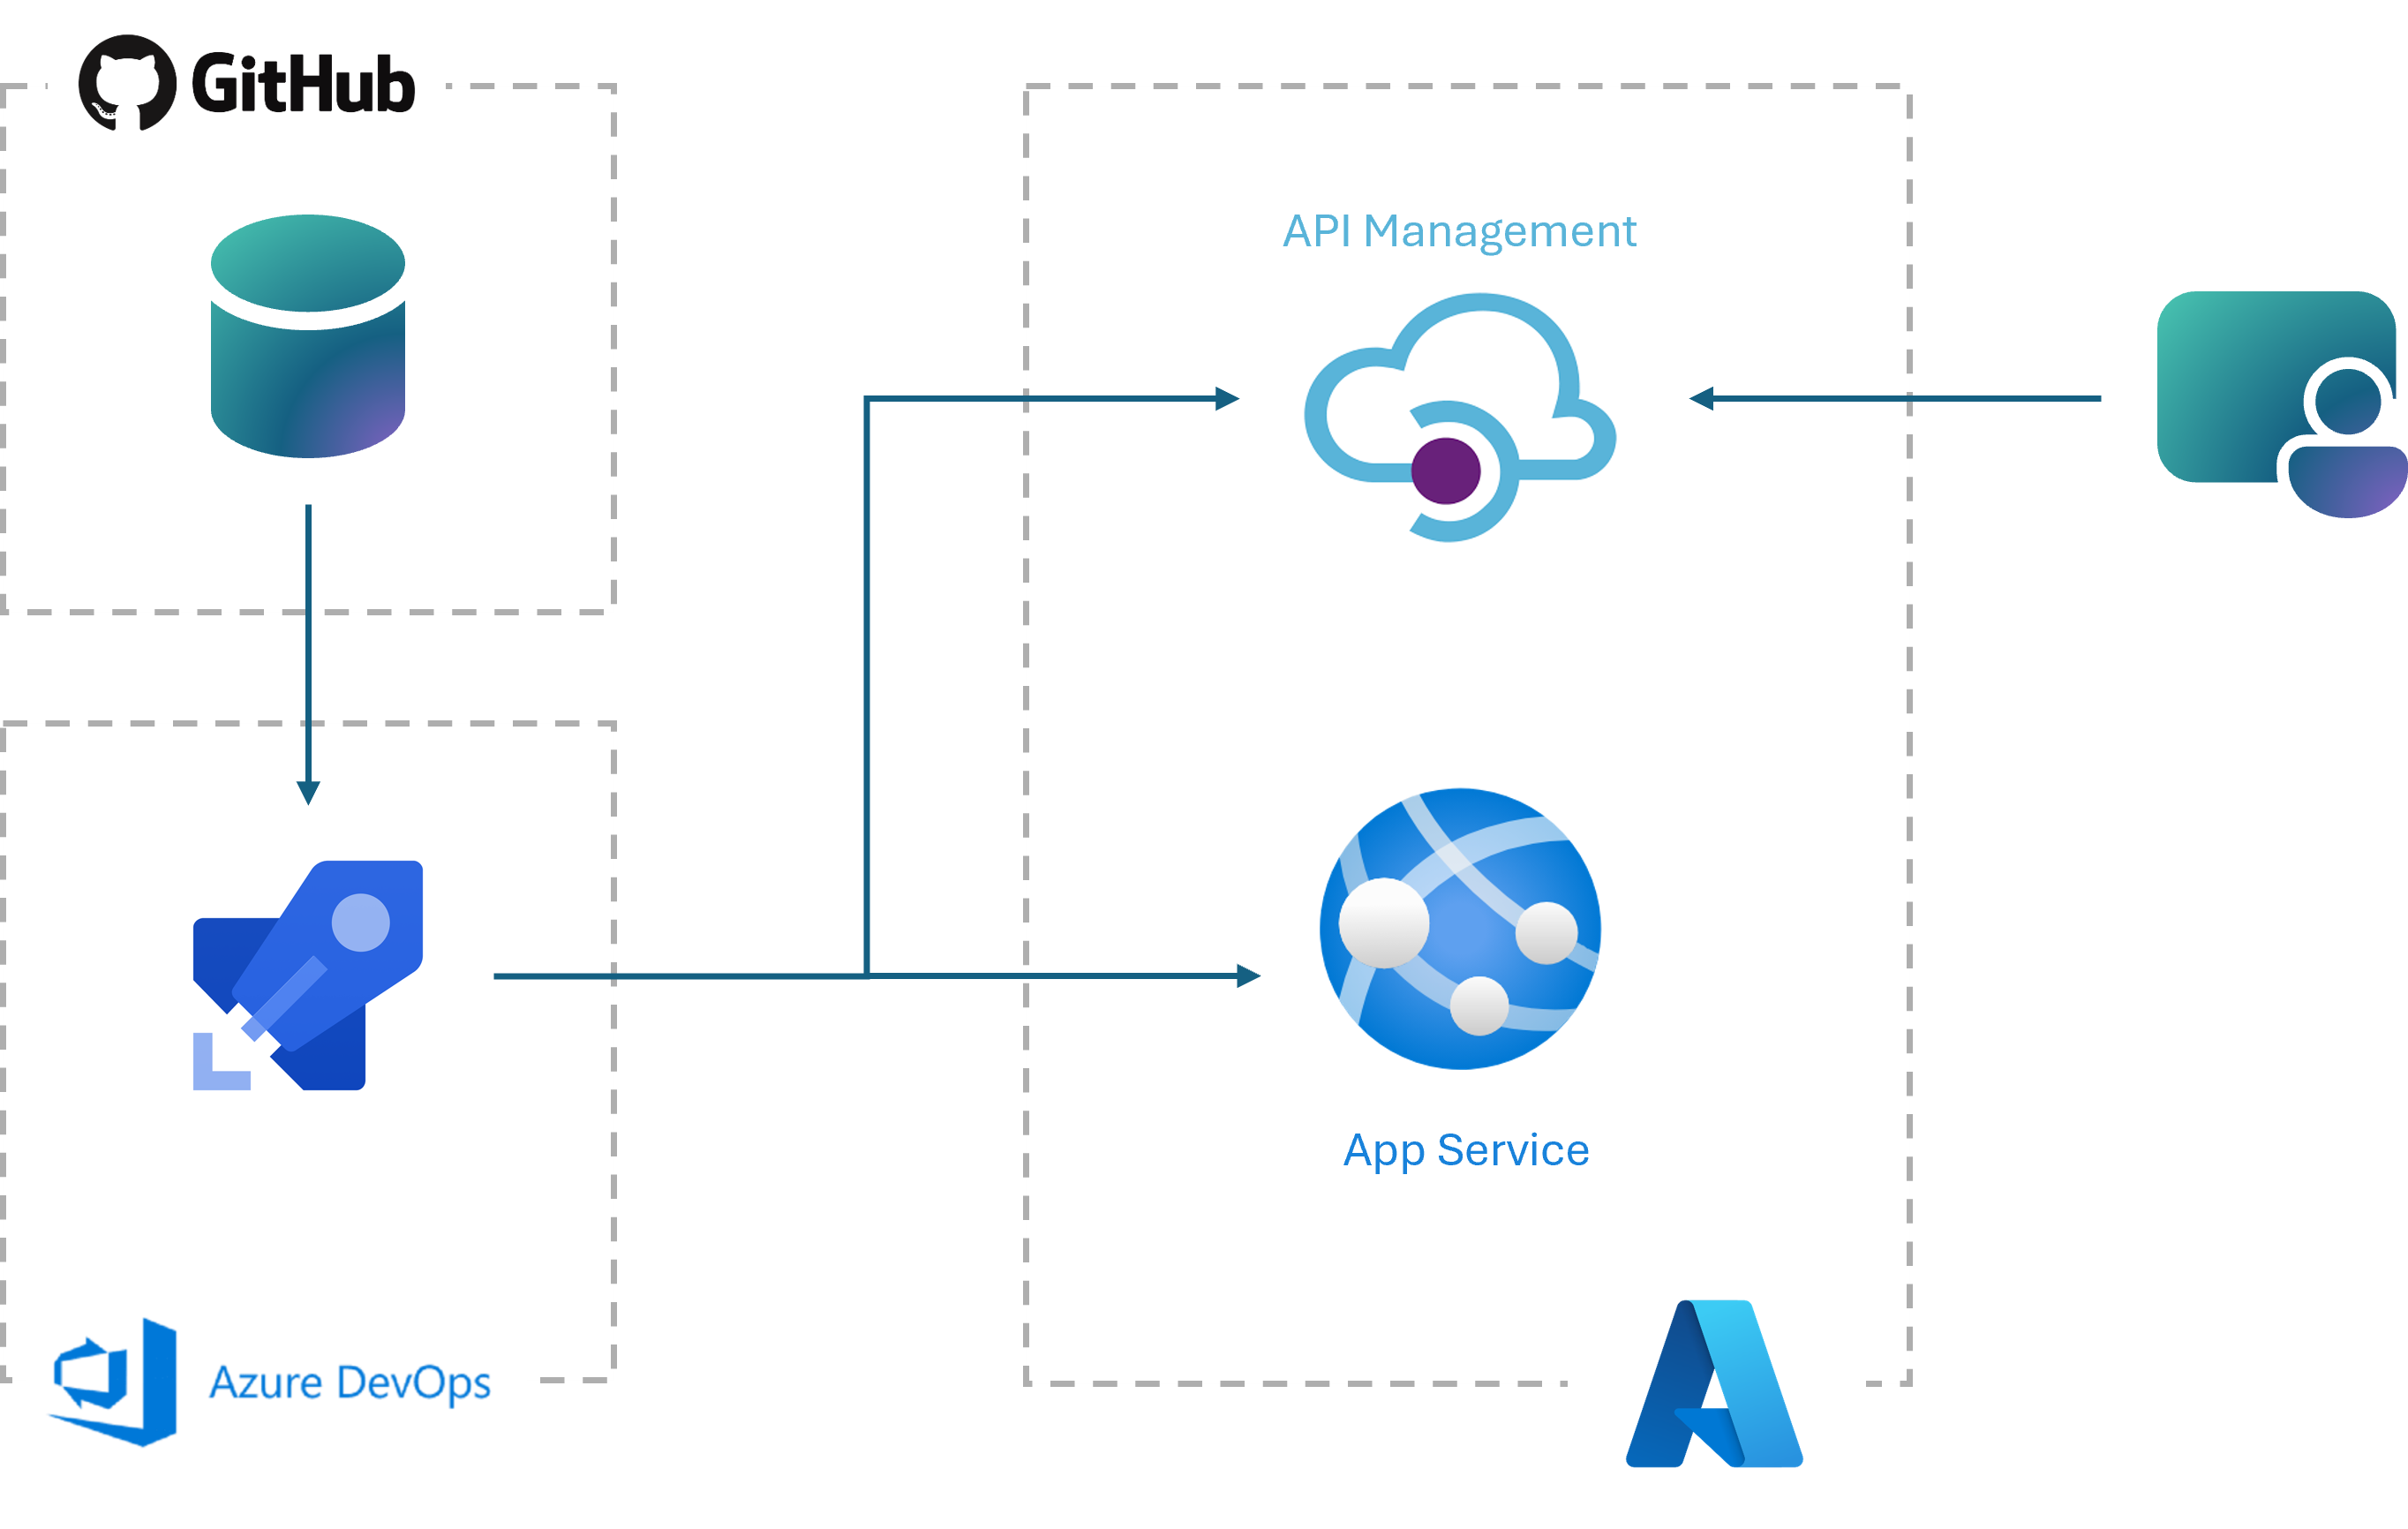
The architecture is based on 3 main components:
- GitHub: Our API code repository and trigger of Continuous Integration.
- Azure DevOps: Our Continuous Delivery tool where are included the deployment pipelines.
- Azure Resources: The Azure Resources to support the solution, mainly the App Service where the API is being deployed to, and our API entry point API Management,
Implementation
Let's start by looking at the baseline versions, the example is developed using .NET 8 ASP.NET API. The full implementation code project is available in this git repo.
If you already have an existing dotnet API and just want to check how to enable the API openapi.json configuration on build, skip the next creation step.
Create a new .NET 8 API
We start by creating our baseline API, in this case we will use a minimalist default dotnet 8 API with OpenAPI configurations enabled:
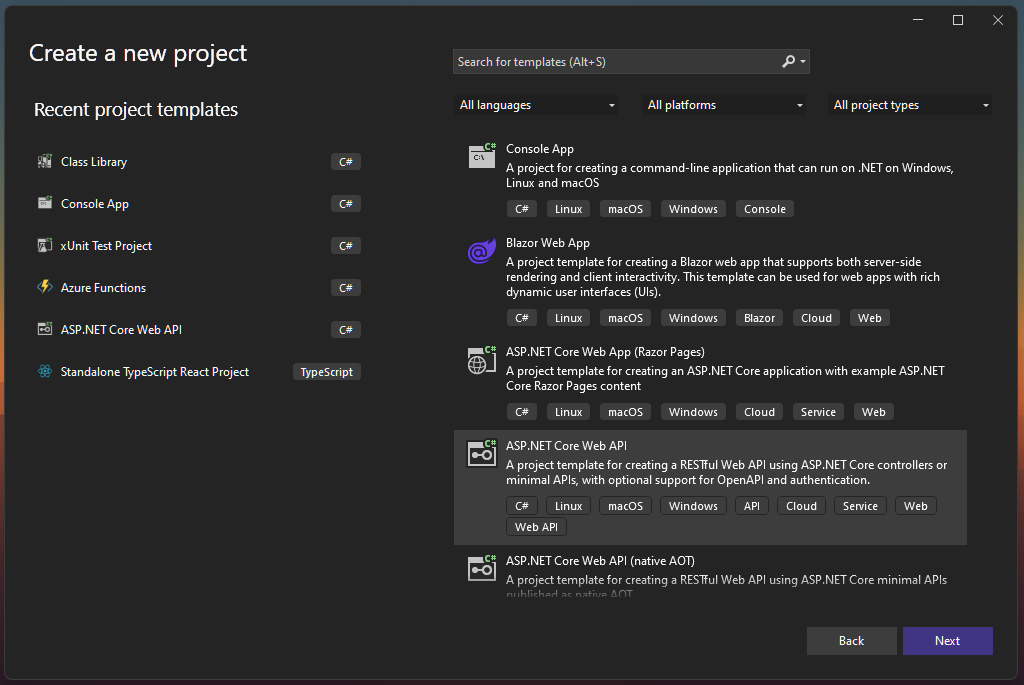
We first create an ASP.NET Core Web API.
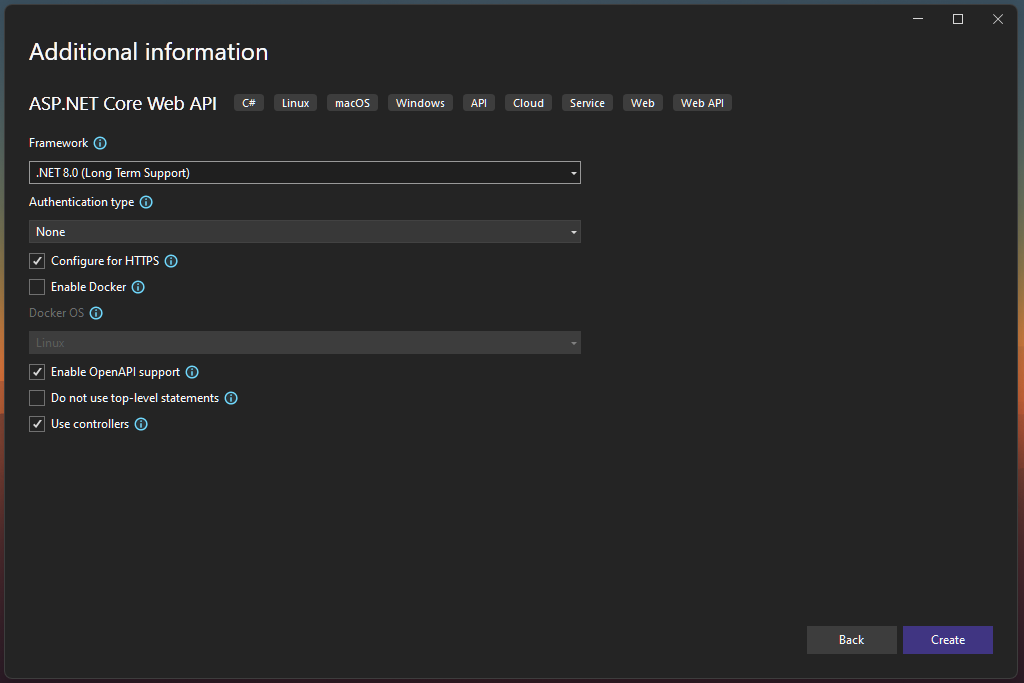
Then we must be sure to select the proper Framework, but also tick the Enable OpenAPI support.
Your API Solution should look something like this: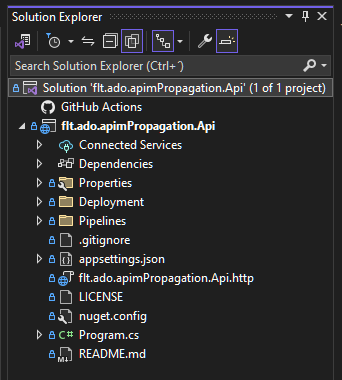 You may note that there are already two new folders added, Deployment and Pipelines, the Deployment folder with hold the main.bicep file which details the Azure infrastructure to be created, the Pipelines folder will hold our pipeline.yml file which will have the Azure DevOps definitions to properly execute all deployment steps.
Azure DevOps Pipeline
After we have our API project up and running we need the necessary steps to build and deploy our application as well as deploy the necessary infrastructure and update the API Management definitions.
The first step is to detail all the steps that we need to fulfill:
- Install the Swashbuckle.AspNetCore.Cli Client Tool in the worker so that we can later on generate the openapi.json spec.
- Restore the API project packages necessary to build the project.
- Publish the API project in a deployable package.
- Generate the API openapi.json spec definition to update APIM later on.
- Zip the package for easier App Service deployment.
- Deploy the Azure necessary infrastructure through our bicep template.
- Update the API Management configurations for our API endpoints.
So let's look at the pipeline.yml file and check step by step on how to do each task.
1. Install Client Tool
- task: DotNetCoreCLI@2 displayName: 'Install Swashbuckle.AspNetCore.Cli v6.5.0' inputs: command: custom custom: tool arguments: 'install --global Swashbuckle.AspNetCore.Cli --version 6.5.0'
2. Restore API Project
- task: DotNetCoreCLI@2 displayName: 'Restore project' inputs: command: 'restore' includeNuGetOrg: true
3. Publish the API Project
In this step we make a particular change, we don't build and zip the package using the task, the reason for this is that we will need the API dll later on, and provide it to the Swashbuckle client tool to generate the openapi.json spec. Later on we will archive all the files and prepare the zip package.
- task: DotNetCoreCLI@2 displayName: 'Publish Project' inputs: command: 'publish' publishWebProjects: false arguments: '-o $(Build.ArtifactStagingDirectory)\Publish' modifyOutputPath: false zipAfterPublish: false
4. Generate the API spec
- task: PowerShell@2 displayName: 'Generate OpenAPI Definition' inputs: targetType: 'inline' script: 'swagger tofile --output $(Build.ArtifactStagingDirectory)\openapi.json $(Build.ArtifactStagingDirectory)\Publish\flt.ado.apimPropagation.Api.dll v1'
In this task we run the command that will allow us to create the OpenAPI spec, feel free to parametrize the dll with your project name to create a template out of it.
5. Zip the Package
- task: ArchiveFiles@2 displayName: 'Zip Deploy Package' inputs: rootFolderOrFile: '$(Build.ArtifactStagingDirectory)\Publish' includeRootFolder: false archiveType: 'zip' archiveFile: '$(Build.ArtifactStagingDirectory)\Publish\Deployment.zip' replaceExistingArchive: true
6. Deploy the Bicep template
The Bicep template holds the definitions to create both the App Service, App Service Plan and the API Management resources in Azure, this was it is easier to reuse the shared project to create your own example.
- task: AzureResourceManagerTemplateDeployment@3 displayName: 'Deploy IaC (bicep)' inputs: deploymentScope: 'Resource Group' azureResourceManagerConnection: '$(azureServiceConnection)' action: 'Create Or Update Resource Group' resourceGroupName: '$(resourceGroupName)' location: '$(resourceGroupLocation)' csmFile: '$(templateFile)' deploymentMode: 'Incremental' deploymentName: 'DeployPipelineTemplate'
7. Deploy the API Project
Now that the infrastructure is ready, let's deploy our API project.
- task: AzureWebApp@1 displayName: 'Deploy WebAPI' inputs: azureSubscription: '$(azureServiceConnection)' appType: 'webApp' appName: 'appServiceFltAdoApimPropagation' package: '$(Build.ArtifactStagingDirectory)\Publish\*.zip'
8. Import API Management API Endpoint
How last step is the magic of it, we will import the API endpoints into API Managament through the Azure CLI and update all the endpoint definitions automatically. More information about the usage of the APIM import can be found here.
- task: AzureCLI@2 displayName: 'Update API Management definition' inputs: azureSubscription: '$(azureServiceConnection)' scriptType: 'ps' scriptLocation: inlineScript inlineScript: | az apim api import --resource-group $(resourceGroupName) --service-name apiserviceFltAdoApimPropagation --api-id weather --path /weather --display-name flt-ado-apim-propagation --specification-format OpenApi --specification-path $(Build.ArtifactStagingDirectory)\openapi.json
Result
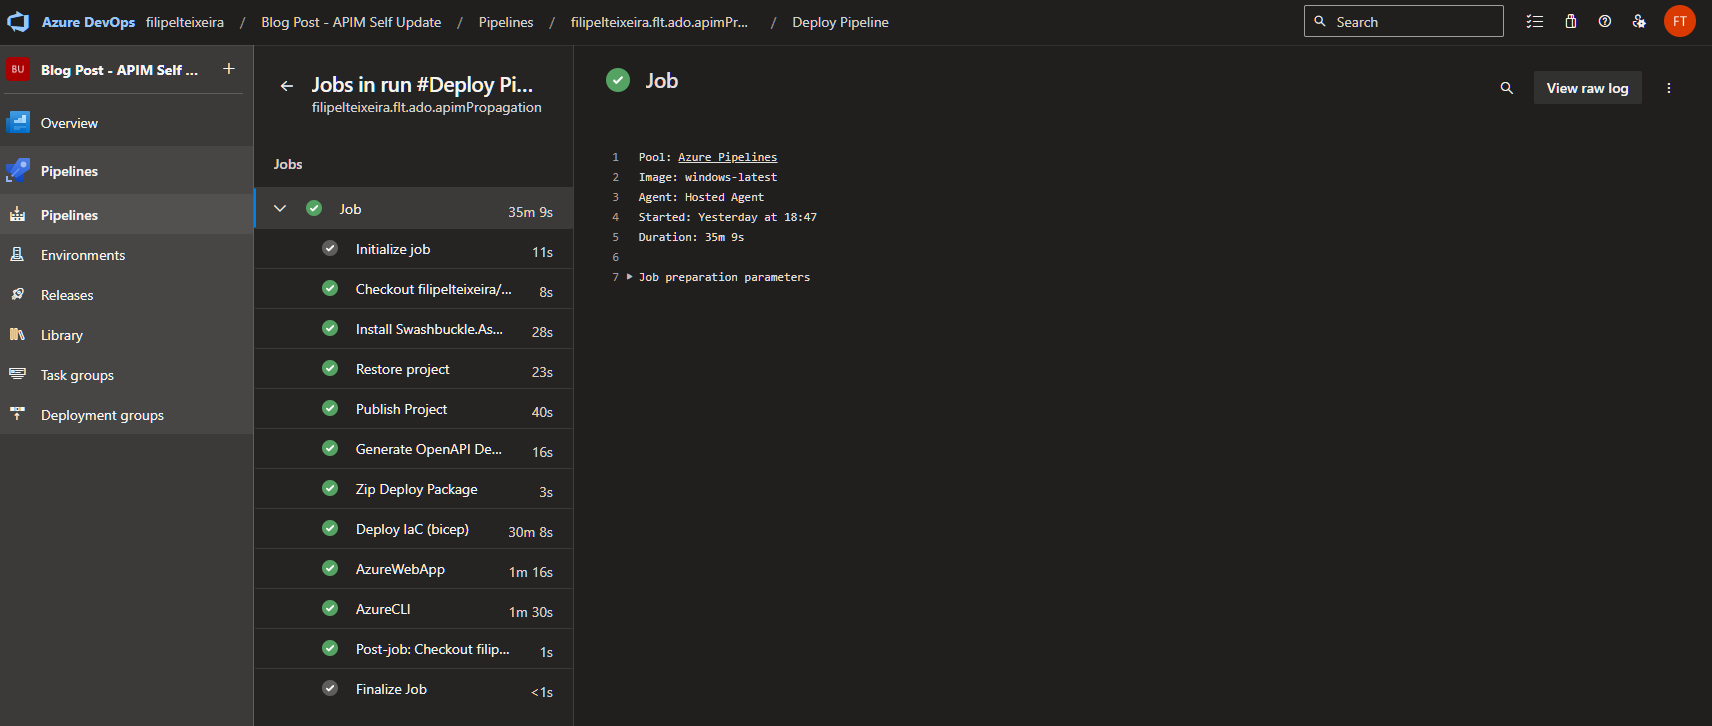
After all of this we should be able to run our pipeline in Azure DevOps, which on a first run should look something like this:
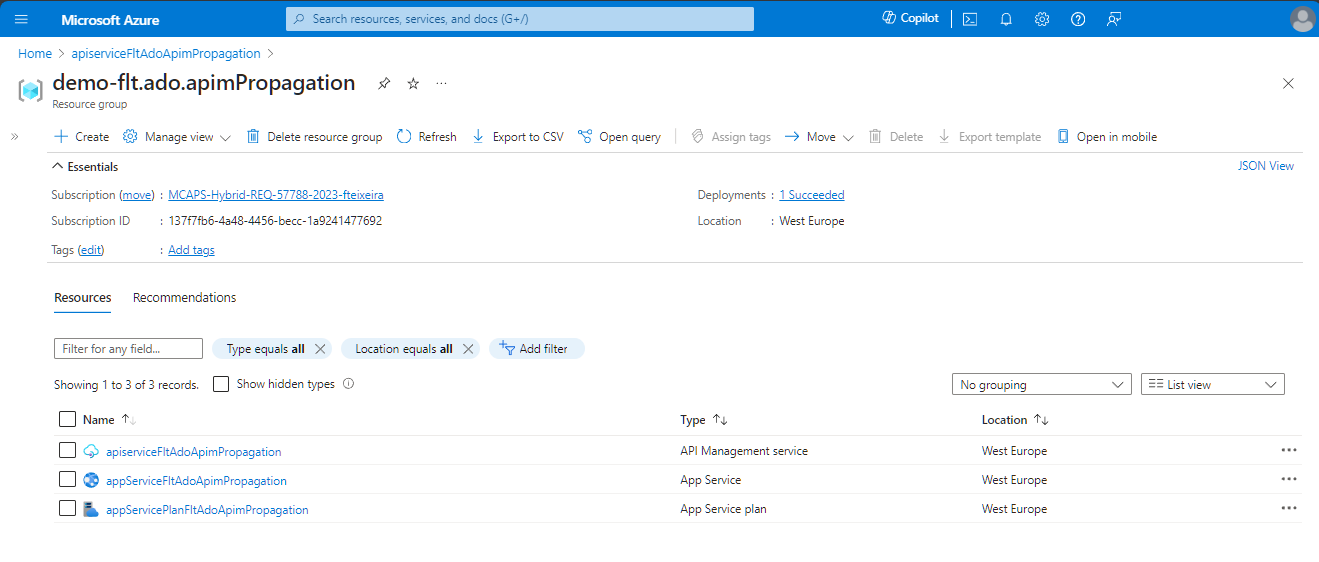
Once we go back to our Azure resource group we should see all the resources deployed in there from scratch:
In the API Management Service we can then check if our API spec definition was successfuly loaded:
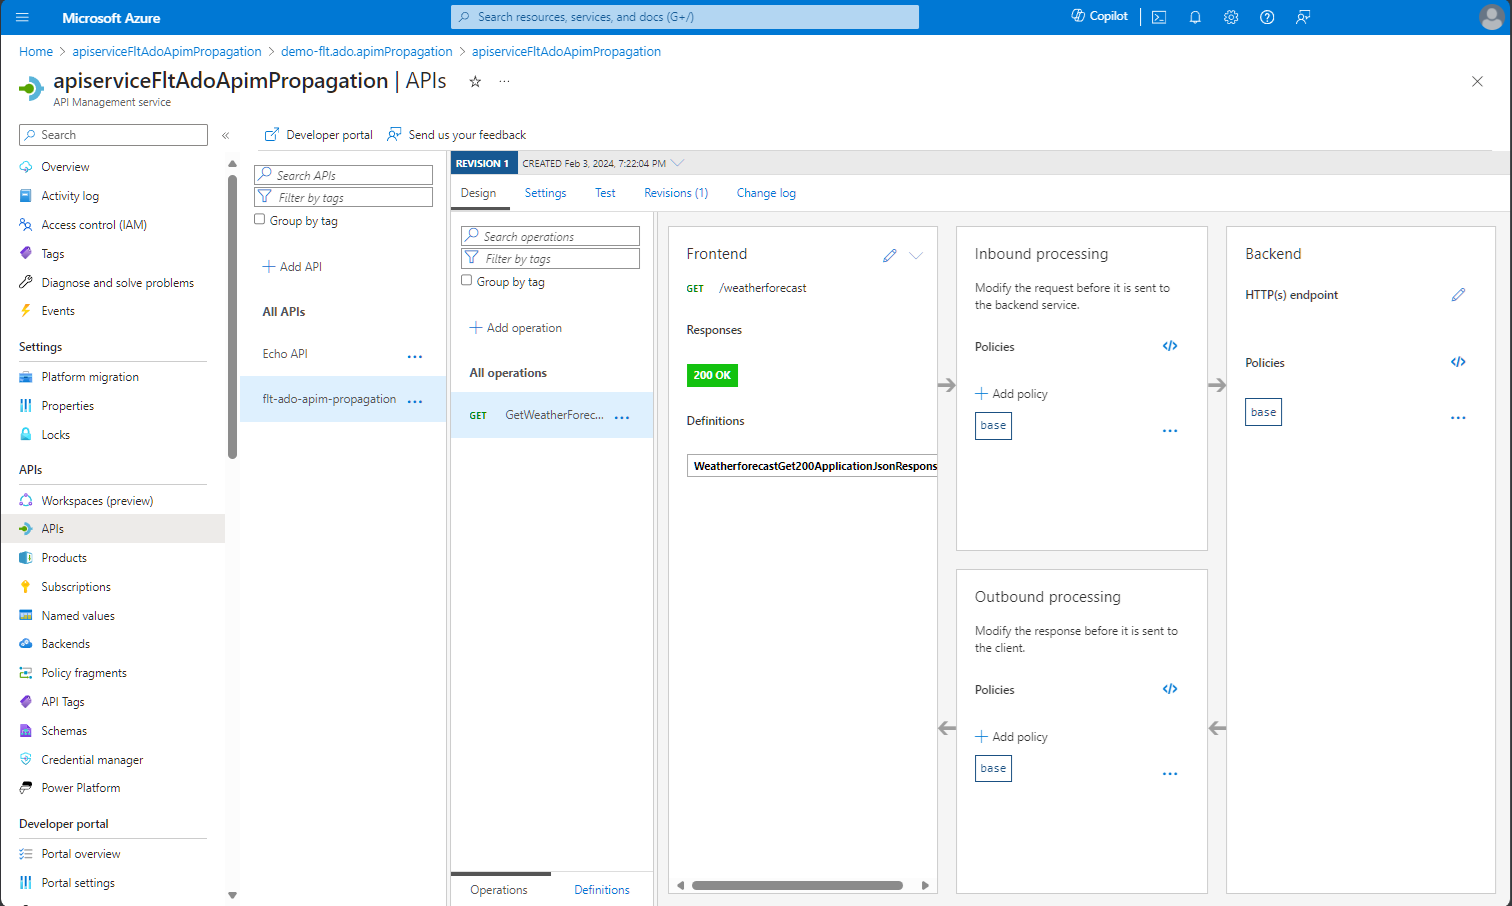
In this case our GetWeatherForecast is available in the /weather path as configured, in the /weatherforecast endpoint.
Conclusion
API integration and management is a big part of large systems challenges, as well as to ensure to eliminate any manual processes that take too much of valuable resources time, but also can lead to human errors. Automation is essential in any system so taking an automated approach to this kind of solutions is necessary for mature applications.
As usual, thank you for reading. I appreciate all the feedback I can get, so feel free to drop a comment bellow or to reach me in social media, links bellow as well.